Looking for a dinner that tastes like a gourmet feast but requires almost zero effort? These cheesy, golden-brown Beef Crescent Squares are the ultimate kitchen hack for busy families and hungry food lovers alike.
An Irresistible Comfort Food Experience
Imagine walking into your kitchen and being greeted by the intoxicating aroma of browning ground beef, melting sharp cheddar, and buttery, flaky pastry. There is something deeply soul-warming about a dish that balances the savory, meaty richness of beef with the gooey, stretchy satisfaction of melted cheese, all wrapped in a crisp, golden crust. These Oven-Baked 4-Ingredient Beef Crescent Squares are not just a meal; they are a sensory experience.
Each bite offers a delightful contrast in textures: the initial crunch of the toasted crescent dough, followed by the soft, pillowy layers of cheese, and finally the hearty, seasoned bite of perfectly cooked beef. Whether you are a busy parent trying to navigate the "witching hour" of weekday dinners, a student looking for a budget-friendly feast, or a home cook who loves the magic of simple ingredients coming together, this recipe is destined to become a permanent fixture in your rotation. It is the kind of food that brings people to the table, demanding attention with every delicious, cheesy pull.
Why You’ll Love This Recipe
If you are looking for a reason to make this tonight, here are five unbeatable benefits:
- Minimalist Ingredient List: With only four main ingredients, there is no need for a massive grocery haul.
- Lightning-Fast Prep: You can go from "hungry" to "cooking" in under 15 minutes.
- Ultimate Crowd-Pleaser: From toddlers to picky eaters, the combination of beef and cheese is almost universally loved.
- Budget-Friendly: This recipe uses pantry staples and affordable proteins, making it incredibly cost-effective.
- Versatile Serving Options: It works equally well as a hearty main course or as a bite-sized appetizer for game day.
The Essential Ingredients
Because this recipe relies on so few components, the quality of your ingredients will directly impact the final result. Here is what you will need and why each part is vital to the success of your Beef Crescent Squares.
The Protein Foundation
1 lb Ground Beef (80–90% lean): The fat content is crucial here. While lean beef is healthier, a slightly higher fat content (around 80/20 or 85/15) ensures the beef stays juicy and flavorful during the browning process. That fat also helps season the dough from the inside out.
The Golden Crust
2 (8 oz) cans Refrigerated Crescent Roll Dough: This is the secret to the dish's texture. The laminated layers of dough create that iconic, buttery, flaky crust that mimics high-end pastry but with the convenience of a refrigerated tube.
The Cheesy Glue
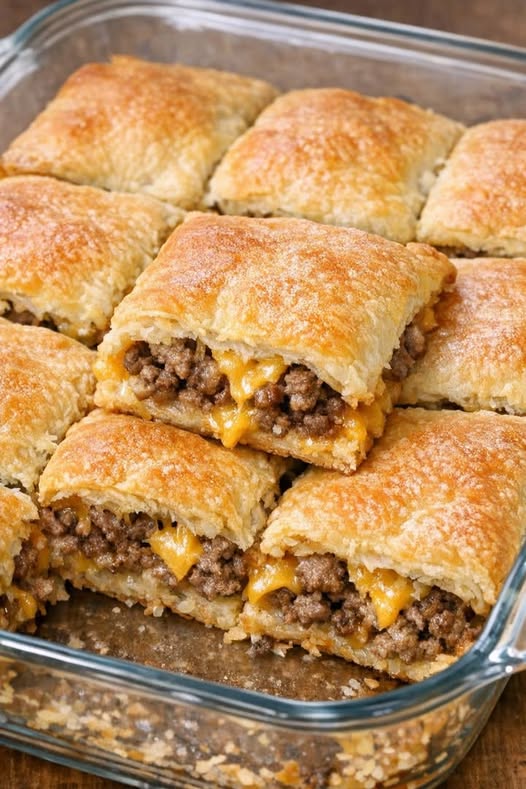
2 cups Shredded Cheddar Cheese (about 8 oz): We use cheese as a structural element. By layering it both under and over the beef, we create a "cheese sandwich" effect that prevents the meat from making the dough soggy while ensuring every square has a luscious, gooey center.
The Flavor Enhancer
1 tsp Kosher Salt (or to taste): While the cheese and dough contain salt, a dedicated seasoning of the beef is necessary to make the meat flavors "pop." Kosher salt is preferred for its larger grains, which allow for better control over seasoning.
Step-by-Step Instructions for Perfection
- Preheat and Prepare Your Vessel: Start by preheating your oven to 375°F (190°C). This temperature is the "sweet spot" for crescent dough—hot enough to create steam for flakiness, but gentle enough to melt the cheese without burning the pastry. Lightly grease a 9x13-inch glass casserole dish with butter or non-stick cooking spray. Pro Tip: Glass is excellent for even heat distribution, helping the bottom crust bake thoroughly.
- Browning the Beef to Perfection: In a large skillet over medium heat, add your ground beef. As it cooks, use a wooden spoon or spatula to break the meat into small, even crumbles. You want a consistent texture so that every square has an equal amount of beef. Cook for about 6–8 minutes until no pink remains. Once browned, carefully drain off the excess grease into a discarded container. Why? If you leave too much grease in the pan, it will seep into your dough and result in a soggy, heavy bottom crust rather than a crisp one.
- Seasoning for Depth: Once the beef is drained, return it to the skillet and sprinkle the 1 tsp of kosher salt over the meat. Stir thoroughly to ensure the salt is evenly distributed. Taste a small piece of the beef; it should taste savory and slightly more seasoned than you would eat it on its own, as the salt will be diluted by the dough and cheese once baked.
- Constructing the Bottom Crust: Unroll your first can of crescent roll dough. Press it into the prepared casserole dish, working from the center outward. The goal is to create a solid, even layer. Pay close attention to the seams—pinch them tightly together so they disappear. This creates a continuous "floor" for your beef and cheese.
- The First Cheese Layer: Evenly sprinkle 1 cup of the shredded cheddar cheese over the bottom dough layer. This isn't just for flavor; this layer of cheese acts as a moisture barrier, protecting the bottom crust from the juices of the beef, ensuring you get that coveted crunch.
- Layering the Hearty Filling: Spread the warm, seasoned ground beef over the cheese layer. Use your spatula to press the beef down gently and evenly. Aim for a uniform thickness so that every slice you cut later is balanced.
- The Second Cheese Layer: Top the beef with the remaining 1 cup of shredded cheddar. Spread it all the way to the edges of the dish. This second layer is what provides that amazing "cheese pull" when you lift a square out of the dish.
- Sealing the Top: Unroll the second can of crescent dough. Lay it gently over the cheese and beef. To ensure a cohesive bake, stretch the dough slightly to cover the gaps and pinch the edges of the top layer to the edges of the bottom layer. This "sealing" process turns the casserole into a closed pastry pocket, trapping steam inside to keep the beef moist.
- The Golden Bake: Slide the dish into the center rack of your oven. Bake for 18–22 minutes. You are looking for two visual cues: the top layer should be puffed up and a deep, toasted golden brown, and you should see cheese bubbling excitedly around the edges of the dish.
- The Essential Resting Period: This is the hardest but most important step. Once you remove the dish from the oven, let it sit for 8–10 minutes before cutting. Why? As the dish rests, the cheese sets and the juices redistribute. If you cut it immediately, the filling will run out, and your squares will lose their shape.
- Slicing and Serving: Using a sharp knife, cut the bake into 9 to 12 even squares. Serve them warm, straight from the dish, to enjoy the maximum level of cheesiness and warmth.
Pro Tips & Secrets for Success
To elevate these Beef Crescent Squares from "good" to "restaurant-quality," keep these expert tips in mind:
- Handle Room-Temperature Dough: If your crescent dough is ice-cold from the fridge, it will be difficult to stretch and prone to tearing. Let the cans sit on the counter for about 10–15 minutes before unrolling.
- Hand-Shred Your Cheese: While pre-shredded cheese is convenient, it is coated in potato starch to prevent clumping in the bag. This starch can hinder the "meltability" of the cheese. For the ultimate gooey experience, buy a block of cheddar and shred it yourself.
- Avoid the "Soggy Bottom" Syndrome: Ensure your beef is thoroughly drained of fat and any excess liquid before layering. If the meat is too wet, the bottom dough will turn mushy.
- Don't Over-Salt: Remember that cheddar cheese is naturally salty, and refrigerated dough often contains sodium. Always taste your beef before adding the full teaspoon of salt.
- Watch the Seams: If you don't pinch the seams of the dough together tightly, the cheese will leak out of the sides during baking, creating a mess in your oven and a less-than-perfectly-contained square.
Variations & Substitutions
While the 4-ingredient version is a masterpiece of simplicity, you can easily customize this recipe to suit your tastes or dietary needs:
- The Spicy Kick: Add a pinch of crushed red pepper flakes or a dash of hot sauce to the beef while browning to give the dish a subtle, warming heat.
- The Gourmet Cheese Swap: For a more sophisticated flavor profile, swap the cheddar for Sharp White Cheddar, Monterey Jack, or even a blend of Gruyère and Emmental.
- The Leaner Alternative: If you prefer a lighter meal, use 93% lean ground beef or even ground turkey. If using turkey, consider adding a teaspoon of beef bouillon to the meat to enhance the savory depth.
- The Appetizer Style: Instead of a 9x13 dish, use a mini muffin tin. Press small pieces of dough into the cups, add a tiny bit of beef and cheese, and top with more dough. These "Beef Crescent Bites" are perfect for parties!
Serving Suggestions & Pairings
To turn these squares into a complete, balanced meal, consider what you serve alongside them. Because the dish is rich and buttery, a bright, acidic side dish works beautifully to cleanse the palate. A crisp garden salad with a lemon vinaigrette or a tangy coleslaw provides the perfect contrast.
If you want to lean into the comfort food theme, serve these with a side of roasted green beans or steamed broccoli. For beverage pairings, a crisp, cold lager or a sparkling apple cider complements the savory beef and salty cheese perfectly. For a kid-friendly lunch, these squares are excellent served alongside fresh fruit slices or carrot sticks.
Make-Ahead, Storage & Reheating Tips
Make-Ahead Prep: You can save time by browning and seasoning your ground beef up to two days in advance. Store it in an airtight container in the refrigerator. When you are ready to bake, just assemble the layers with the cold beef; however, you may need to add 3–5 minutes to the total bake time.
Storage: Once cooled, store any leftovers in an airtight container in the refrigerator for up to 3–4 days. These make fantastic, high-protein lunches for the week!
Reheating: To maintain the integrity of the crust, avoid the microwave if possible, as it can make the dough chewy. Instead, reheat in a 350°F (175°C) oven for about 10 minutes. For a quick and crispy reheat, the air fryer is a game-changer—just heat at 350°F for 3–5 minutes until the cheese is bubbly again.
Frequently Asked Questions (FAQ)
Can I use ground turkey instead of beef?
Yes! Ground turkey or chicken works perfectly well. Just keep in mind that poultry is generally leaner and has a milder flavor, so you might want to add a little extra seasoning (like onion powder or garlic powder) to the meat to ensure it remains flavorful.
How do I prevent the bottom crust from getting soggy?
There are two main secrets: first, ensure you drain the grease from the beef very thoroughly. Second, always include that first layer of shredded cheese between the dough and the meat. The cheese acts as a waterproof barrier that keeps the meat juices from soaking into the bottom pastry.
Can I freeze these Beef Crescent Squares?
While you can freeze the assembled, unbaked casserole, it is not highly recommended as the dough may lose its flakiness upon thawing. It is much better to bake the dish, let it cool completely, and then freeze the cooked squares. Reheat them in the oven to restore the texture.
What if I can't find crescent roll dough?
If crescent dough is unavailable, you can use refrigerated biscuit dough, though the texture will be more "bready" and less "flaky." You could also use homemade pie crust or puff pastry for a more elevated, buttery result.
Conclusion
There you have it—the only 4-Ingredient Beef Crescent Squares recipe you will ever need! This dish proves that you don't need a pantry full of exotic ingredients to create a meal that is deeply satisfying, incredibly delicious, and stress-free. It is the ultimate solution for those hectic weeknights when you want something special without the mountain of dishes.
Give this recipe a try tonight! Once you experience that first cheesy, beefy, flaky bite, you'll understand why it's a total game-changer. If you loved this recipe, please leave a comment below telling us how it turned out, or share this post with a friend who needs some easy dinner inspiration!