Imagine a dessert so velvety, so decadently smooth, that you would swear it was sourced from the finest artisanal creamery. Most people believe that creating world-class ice cream requires expensive machinery and hours of tedious churning, but we are about to shatter that myth. This recipe introduces you to the magic of no-churn ice cream—a method that delivers an unbelievably rich texture using only a few premium ingredients.
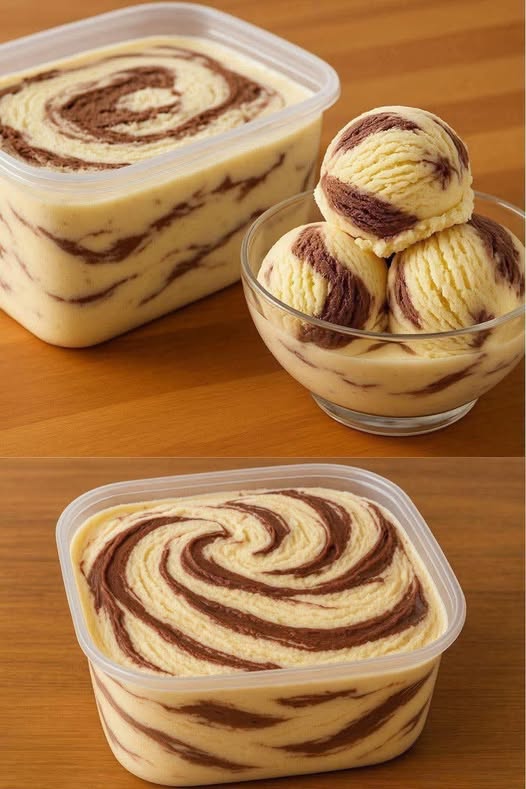
The secret to this masterpiece lies in the marriage of a luxurious vanilla base, crafted from sweetened condensed milk and heavy cream, and a sophisticated, hand-swirled chocolate truffle ganache. The result is a stunning marbled dessert that offers a deep, cocoa-infused experience in every single bite. Whether you are hosting an elegant dinner party or simply treating yourself to a moment of pure indulgence, this easy homemade ice cream is your ticket to dessert perfection.
Ingredients You Will Need
To achieve that signature professional texture, ensure your ingredients are fresh and of high quality.
For the Creamy Ice Cream Base:
- Sweetened Condensed Milk: 2 cans (approximately 800g / 28 oz)
- Heavy Cream: 2 cartons (400g / 14 oz)
- Powdered Milk: 1 cup (100g / 3.5 oz) – This adds incredible creaminess and prevents ice crystals.
- Vanilla Extract: 1 tablespoon (Use pure vanilla for the best flavor profile)
For the Decadent Truffle Ganache:
- Semi-Sweet or Milk Chocolate: 200g (7 oz), finely chopped
- Heavy Cream: ½ carton (100g / 3.5 oz)
Step-by-Step Instructions
Follow these steps carefully to ensure a smooth, professional-grade finish without the need for an ice cream maker.
- Prepare the Base: In a high-speed blender, combine the sweetened condensed milk, heavy cream, powdered milk, and vanilla extract.
- Blend to Perfection: Blend the mixture on medium speed until it is completely homogeneous and silky smooth.
- The Initial Chill: Pour the mixture into a freezer-safe container with a tight-fitting lid. Place it in the freezer for exactly two hours.
- Craft the Ganache: While the base is chilling, melt your chocolate using a double boiler or in the microwave in 30-second increments, stirring between each burst to prevent scorching. Once smooth, stir in the heavy cream vigorously until the ganache is glossy and uniform. Set it aside to cool until it reaches a thick, pourable consistency.
- The Texture Break: Remove the partially set ice cream base from the freezer. Use a spoon or spatula to stir the mixture vigorously; this breaks up any initial ice crystals and ensures a smoother mouthfeel.
- The Marble Swirl: Drizzle the cooled chocolate ganache over the top of the ice cream. Using a knife or a spoon, gently fold the chocolate into the base just a few times. Do not overmix—the goal is beautiful, dark chocolate ribbons, not a solid chocolate ice cream.
- Final Set: Cover the container securely and return it to the freezer for at least four to six hours, or until completely firm.
Why This Recipe is Loved & Pro Tips for Success
This recipe has become a favorite because it removes the barrier to entry for gourmet desserts. It is foolproof, requires zero specialized equipment, and tastes significantly better than store-bought alternatives. To ensure you achieve "award-winning" results, keep these pro tips in mind:
- Temperature is Everything: Ensure your heavy cream is ice-cold when you begin blending. Cold cream incorporates air more effectively, leading to a lighter, fluffier texture.
- Master the Ganache: The ganache should be thick like pudding when you swirl it. If it is too runny, it will sink to the bottom; if it is too thick, it won't marble.
- The Secret Stir: Don't skip the stir at the two-hour mark! This is the professional secret to preventing large ice crystals from forming, ensuring that "melt-in-your-mouth" sensation.
- Use a Wide Container: Freezing in a shallow, wide container allows for more even temperature distribution, resulting in a more consistent freeze.
Serving Suggestions
To elevate your dessert experience, try these sophisticated serving ideas:
- The Warm Contrast: Serve a large scoop alongside a warm, fudgy brownie or a seasonal fruit crumble.
- The Gourmet Affogato: Drizzle a shot of hot espresso over a scoop of the truffle ice cream for a sophisticated caffeine kick.
- The Fruit Pairing: Add a side of fresh raspberries or macerated strawberries to cut through the richness of the chocolate.
- The Crunch Factor: Top with toasted hazelnuts or crushed sea-salt brittle for added textural complexity.
Conclusion: A Masterpiece in Every Scoop
Creating a world-class dessert doesn't have to be complicated. This Easy Homemade No-Churn Ice Cream proves that with just a few high-quality ingredients and a little bit of love, you can produce a treat that rivals any high-end boutique. It is rich, creamy, and visually stunning—a true testament to the beauty of simple, thoughtful cooking. Stop settling for mediocre frozen desserts and start enjoying the luxurious, chocolate-marbled perfection you deserve. Happy scooping!