Looking for the perfect balance of savory, sweet, and crunchy? This Creamy Bacon Pea Salad is the ultimate crowd-pleasing side dish that turns any meal into a celebration. Whether it's a backyard BBQ, a holiday potluck, or a simple weeknight dinner, this recipe delivers unmatched flavor in minutes.
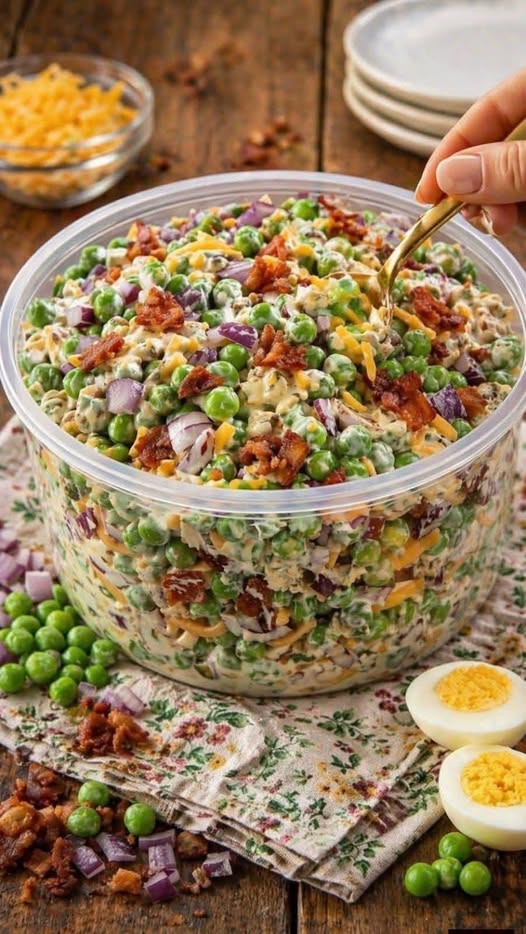
Imagine a bowl filled with vibrant, emerald-green peas that pop with sweetness in every bite. Now, imagine those peas tossed in a velvety, tangy dressing that clings perfectly to every morsel, punctuated by the salty, smoky crunch of perfectly crisped bacon. Add in the sharp, savory bite of aged cheddar cheese and the subtle zing of red onion, and you have a culinary masterpiece that hits every single taste bud. This isn't just a salad; it's a nostalgic, comforting experience that reminds you of sunny afternoons and laughter-filled gatherings. It is the kind of dish that disappears from the buffet table within minutes, leaving everyone asking, "Wait, can I have that recipe?" Home cooks everywhere are obsessed with this dish because it requires minimal effort but delivers maximum impact, making it a staple for anyone who loves effortless gourmet flavor.
Why You'll Love This Creamy Bacon Pea Salad
If you are searching for a reliable, delicious, and versatile side dish, look no further. Here is why this recipe deserves a permanent spot in your culinary rotation:
- Incredibly Quick Prep: This is a no-cook recipe (aside from the bacon!) that comes together in mere minutes.
- The Ultimate Crowd-Pleaser: The combination of sweet peas and salty bacon is a flavor profile that appeals to children and adults alike.
- Budget-Friendly Ingredients: You don't need expensive superfoods to make a gourmet-tasting salad; these pantry and freezer staples do the heavy lifting.
- Make-Ahead Friendly: Unlike leafy green salads that wilt, this salad actually improves as it sits, making it ideal for meal prep or event planning.
- Texture Heaven: You get the crunch from the onion and bacon, the creaminess from the dressing, and the "pop" from the peas.
The Essential Ingredients
To achieve the perfect balance of flavors, quality matters. While this recipe is simple, choosing the right components will elevate your salad from "good" to "unforgettable."
The Main Components
- 4 cups Frozen Green Peas (Thawed): Using frozen peas is a pro-tip; they are often sweeter and more vibrant than fresh peas out of season. Just ensure they are fully thawed and dried!
- 6 slices Bacon (Cooked and Crumbled): This is your salt and smoke engine. For the best results, cook your bacon until it is very crispy so it maintains its texture against the creamy dressing.
- 1 cup Shredded Cheddar Cheese: I recommend a sharp or extra-sharp cheddar. The sharpness cuts through the richness of the mayonnaise and sour cream beautifully.
- ½ cup Red Onion (Finely Chopped): Red onion provides a necessary bite and a beautiful pop of color. Chopping it finely ensures you get a hint of onion in every bite without overwhelming the palate.
The Creamy Dressing
- ¾ cup Mayonnaise: This provides the luscious, silky base that makes this salad so satisfying.
- 2 tbsp Sour Cream: The sour cream adds a sophisticated tang and lightens the density of the mayo.
- 1 tbsp Apple Cider Vinegar (or Lemon Juice): This acidity is crucial. It brightens the entire dish and prevents the fats from feeling too heavy.
- 1 tsp Sugar: A tiny amount of sugar acts as a flavor enhancer, bridging the gap between the savory bacon and the sweet peas.
- ½ tsp Salt & ½ tsp Black Pepper: Always season to taste, but these essentials bring all the individual flavors into harmony.
Optional Add-ins for Extra Flair
- 2 Hard-Boiled Eggs (Chopped): Adding eggs adds an extra layer of creamy texture and a boost of protein.
- 1 tbsp Fresh Dill or Parsley: Fresh herbs provide a burst of garden-fresh aroma that elevates the salad to a professional level.
Step-by-Step Instructions: How to Make the Perfect Pea Salad
- Prepare the Peas Thoroughly: Start by thawing your frozen peas completely. This is perhaps the most critical step. Once thawed, place them in a colander and pat them dry with paper towels. If the peas are too wet, the moisture will dilute your dressing, resulting in a watery, unappealing salad. You want the peas to be plump and dry so the dressing clings to them rather than sliding off.
- Cook the Bacon to Crispy Perfection: Place your bacon slices in a cold pan and gradually bring it up to medium heat. This allows the fat to render out slowly, ensuring the bacon gets crispy all the way through. Once cooked, transfer the bacon to a plate lined with paper towels to drain. Once cooled, crumble it into small, bite-sized pieces. We want enough bacon to distribute throughout the salad, but not so much that it overwhelms the peas.
- Whisk the Signature Dressing: In a medium-sized mixing bowl, combine the mayonnaise, sour cream, apple cider vinegar (or lemon juice), sugar, salt, and black pepper. Whisk these ingredients vigorously until the mixture is completely smooth and emulsified. By making the dressing separately, you ensure that every single pea and piece of cheese is perfectly seasoned. Taste the dressing at this stage—it should be tangy, creamy, and well-balanced.
- Combine the Main Ingredients: In a large, chilled mixing bowl, combine your dried peas, crumbled bacon, shredded cheddar cheese, and finely chopped red onion. Using a large bowl gives you enough room to work without making a mess, and a chilled bowl helps keep the ingredients fresh as you work.
- The Gentle Fold: Pour your prepared creamy dressing over the pea mixture. Using a large spatula, gently fold the ingredients together. You want to coat every piece of food thoroughly, but avoid stirring too aggressively. Aggressive stirring can crush the peas or turn the dressing into a mushy paste. Aim for a light, airy fold that preserves the integrity of the vegetables and the crunch of the bacon.
- The Chill Factor: Cover the bowl tightly with plastic wrap or transfer the salad to an airtight container. Refrigerate the salad for at least one hour before serving. This "resting period" is the secret to greatness; it allows the flavors to marry and the dressing to thicken slightly, creating a much more cohesive and delicious dish.
- Final Service: Just before bringing the dish to the table, give it one last gentle stir. If the salad has thickened too much in the fridge, you can add a tiny splash of milk or more sour cream to loosen it up. Garnish with extra bacon crumbles or a sprinkle of fresh dill for a beautiful, professional presentation.
Pro Tips & Secrets for Success
As an expert in the kitchen, I want you to avoid the common pitfalls that amateur cooks often face. Follow these tips to ensure your Creamy Bacon Pea Salad is flawless every single time:
- The Moisture Rule: I cannot stress this enough—dry your peas! Water is the enemy of a good creamy salad. If you skip this, you'll end up with a puddle at the bottom of your bowl.
- Use Sharp Cheese: Do not use mild cheddar. The richness of the mayo and bacon requires the "bite" of a sharp cheddar to create a balanced flavor profile.
- Temperature Matters: Serve this salad cold. For the best experience, ensure your bowl and your ingredients are chilled before you begin mixing.
- Bacon Texture: If you prefer a softer salad, you can add the bacon closer to serving. However, for the best contrast, add it during mixing so the smoky fat slightly softens into the dressing.
- Don't Over-Salt: Remember that bacon and cheddar cheese are both naturally high in sodium. Taste your dressing before adding extra salt to avoid an oversalted final product.
Variations & Substitutions
One of the beauties of this recipe is how easily it can be adapted to your dietary needs or personal preferences. Here are four fantastic ways to switch things up:
- The Low-Carb/Keto Version: To make this keto-friendly, simply reduce the amount of peas and increase the amount of bacon and cheese. Replace the sugar in the dressing with a keto-friendly sweetener like erythritol or simply omit it and add an extra splash of vinegar for tang.
- The Mediterranean Twist: Swap the cheddar for crumbled feta cheese and replace the red onion with diced cucumbers and kalamata olives. Use lemon juice instead of apple cider vinegar for a brighter, fresher profile.
- The Spicy Kick: If you love heat, add finely diced jalapeños or a teaspoon of hot sauce to the dressing. The spice pairs incredibly well with the sweetness of the peas.
- The Garden Fresh Variation: For a lighter, more "spring-like" feel, use Greek yogurt instead of sour cream and add plenty of fresh herbs like chives, parsley, and mint.
Serving Suggestions & Pairings
This salad is incredibly versatile and can serve as a light lunch or a heavy-hitting side dish. To elevate your meal, consider these pairings:
Main Dishes: This salad is the perfect companion for smoky BBQ meats. Think slow-cooked pulled pork, grilled baby back ribs, or even a classic juicy cheeseburger. The acidity in the dressing helps cut through the richness of grilled meats. It also works beautifully alongside grilled chicken breasts or salmon fillets.
Plating Idea: For a fancy brunch or garden party, serve individual portions in small glass ramekins or even hollowed-out bell pepper halves for a colorful, gourmet presentation.
Make-Ahead, Storage & Reheating Tips
Make-Ahead: This is one of the best recipes for party planners! You can prepare the entire salad up to 24 hours in advance. In fact, many people find that the flavors are even more pronounced the next day. Just be sure to keep it tightly sealed in the refrigerator.
Storage: Store any leftovers in an airtight container in the refrigerator. It will stay fresh and delicious for up to 3 days. Beyond that, the peas may begin to lose their texture and the dressing may become too thin.
Reheating: Note: This is a cold salad! Do not attempt to reheat this dish in the microwave or oven. If it has become too cold or firm in the fridge, let it sit at room temperature for about 10–15 minutes before serving to allow the flavors to open up again.
Frequently Asked Questions (FAQ)
Can I use fresh peas instead of frozen?
Yes, you certainly can! However, fresh peas often have a different texture. To get the best results, I recommend blanching the fresh peas in boiling water for 1–2 minutes, then immediately plunging them into an ice bath. This preserves their vibrant green color and "pops" while ensuring they are tender enough to eat.
How do I prevent my pea salad from becoming watery?
The two main culprits of a watery salad are improperly thawed peas and adding too much liquid to the dressing. Always ensure your peas are completely thawed and, most importantly, patted dry with a paper towel before mixing. Also, avoid adding extra water or thin juices to your dressing.
Is this recipe keto-friendly?
As written, the recipe contains peas and a small amount of sugar, which adds carbohydrates. However, you can easily make it keto-friendly by reducing the pea portion, omitting the sugar, and increasing the bacon and cheese content. Using full-fat mayonnaise and sour cream will also help keep it within keto macros.
Can I freeze this salad?
No, I do not recommend freezing this salad. Freezing will change the texture of the peas, making them mushy, and will cause the creamy dressing to separate and become grainy once thawed. This dish is best enjoyed fresh or chilled in the refrigerator.
Experience the Magic of This Creamy Bacon Pea Salad
There are many side dishes out there, but very few can claim to be the star of the show. This Creamy Bacon Pea Salad is one of those rare recipes that manages to be simple, nostalgic, and absolutely crave-worthy all at once. With its perfect harmony of sweet peas, salty bacon, and tangy dressing, it is guaranteed to become a favorite in your household and a hit at every gathering you host.
Stop settling for boring side dishes and start serving something your guests will actually talk about! Whether you're making this for a quick Tuesday night dinner or a massive summer blowout, you can trust this recipe to deliver perfection every time. Give it a try today!
If you loved this recipe, please leave a comment below and let me know how it turned out! Don't forget to share this post with your fellow food lovers and pin it to your favorite recipe board on Pinterest!