There is nothing quite like the heavenly aroma of freshly baked bread wafting through a home, signaling warmth, comfort, and nourishment. If you have ever craved that perfect, pillowy texture found in traditional farmhouse kitchens, our Amish White Bread recipe is your golden ticket. This isn't just your average loaf; it is a masterclass in simplicity. With a tender crumb, a delicate hint of sweetness, and a crust that is perfectly golden, this bread is designed to melt in your mouth. Whether you are a seasoned baker or a beginner, this recipe promises a professional-quality loaf that puts store-bought bread to shame.
Ingredients You'll Need
To achieve that authentic Amish flavor, you only need a few pantry staples. Quality ingredients make all the difference!
- All-Purpose Flour: 6 to 7 cups (plus extra for dusting)
- Warm Water: 2 cups (Temperature should be between 110°F and 115°F)
- Granulated Sugar: 1/2 cup (This provides that signature subtle sweetness)
- Active Dry Yeast: 1 1/2 tablespoons
- Vegetable Oil: 1/4 cup (For a soft, moist texture)
- Salt: 2 teaspoons (To balance the flavors)
Step-by-Step Instructions
1. Activate the Yeast (The Bloom)
In a large mixing bowl, combine your warm water and sugar. Stir gently until the sugar is fully dissolved. Sprinkle the active dry yeast over the surface and let it sit undisturbed for 5–10 minutes. You are looking for a beautiful, foamy layer to form on top—this is the sign that your yeast is alive and ready to make your bread rise.
2. Mix the Dough
Once the yeast is foamy, pour in the vegetable oil and salt, stirring to combine. Begin adding the flour one cup at a time. If you are using a stand mixer, use the dough hook attachment; otherwise, a sturdy wooden spoon works perfectly. Continue adding flour gradually until a soft, cohesive dough forms and begins to pull away from the sides of the bowl.
3. Knead for Perfection
Turn the dough out onto a lightly floured surface. Knead the dough for 6–8 minutes by hand, or about 5 minutes on medium speed in a stand mixer. You are looking for a texture that is smooth, elastic, and slightly tacky but not sticky. This step develops the gluten, which is crucial for that airy, soft structure.
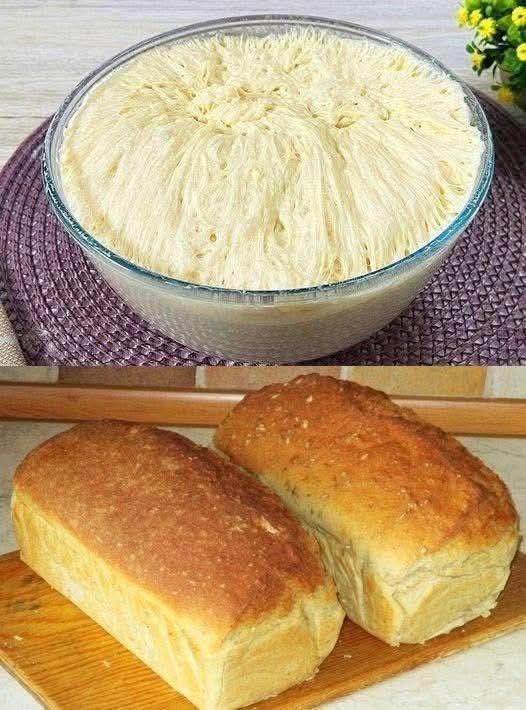
4. The First Rise
Shape your dough into a smooth ball and place it in a lightly greased bowl. Cover the bowl with a clean kitchen towel or plastic wrap to retain moisture. Place it in a warm, draft-free spot and let it rise for 1 to 1.5 hours, or until it has visibly doubled in size.
5. Shape the Loaves
Gently punch down the risen dough to release excess air bubbles. Divide the dough into two equal portions and shape each into a neat loaf. Place them into two greased 9×5-inch loaf pans. Cover them loosely and allow a second rise for 30–45 minutes, until the dough rises just above the rim of the pans.
6. Bake to Golden Perfection
Preheat your oven to 350°F (175°C). Once the dough has risen, bake for 25–30 minutes. The tops should be a beautiful golden brown, and the loaves should sound hollow when lightly tapped on the bottom. Crucial Step: Immediately transfer the loaves to a wire rack to cool. This prevents the bottom from becoming soggy due to steam.
Why This Recipe is a Crowd Favorite
This Amish White Bread is beloved because it hits the "sweet spot" of baking: it is substantial enough for a hearty sandwich but soft enough to be enjoyed by toddlers and seniors alike. The addition of oil ensures the bread stays moist for days, unlike traditional water-only breads that can dry out quickly. It captures the essence of nostalgic, homemade goodness in every single bite.
Pro Tips for Bread-Making Success
- Watch Your Water Temp: This is the most common mistake! If the water is over 120°F, you might kill the yeast. If it’s too cold, the bread won't rise. Use a kitchen thermometer to be precise.
- Don't Over-Flour: It is tempting to keep adding flour until the dough is easy to handle, but too much flour results in a heavy, dense loaf. Aim for a soft, slightly tacky dough.
- The "Hollow Tap" Test: To ensure your bread is fully baked, always tap the bottom. A hollow sound is the gold standard for doneness.
- Storage Secret: For maximum freshness, store in an airtight container at room temperature. If you won't finish the loaf within 3 days, slice it and freeze it in a freezer bag to preserve that "just baked" softness.
Serving Suggestions
While this bread is spectacular on its own, the possibilities are endless:
- The Classic: Thick slices toasted with salted farm butter and a drizzle of local honey.
- The Breakfast Treat: Use slices for the ultimate French Toast, soaked in cinnamon custard.
- The Lunchtime Staple: The perfect base for turkey and Swiss sandwiches or grilled cheese.
- The Comfort Combo: Serve warm alongside a bowl of hearty tomato soup or beef stew.
Master the Art of Homemade Baking
Making your own Amish White Bread is more than just following a recipe; it is about bringing a sense of tradition and warmth into your kitchen. Despite the seemingly complex process of yeast and rising, the actual ingredients are simple and the steps are straightforward. You don't need professional equipment to achieve bakery-quality results—just a little patience and a love for good food. Roll up your sleeves and start baking today; your family will thank you for every delicious, pillowy slice!